
How to replace an espresso machine shower screen
A 10-minute job that most home machines need every 6 to 12 months. Tools, torque, gasket decisions, and the mistakes that cause leaks.
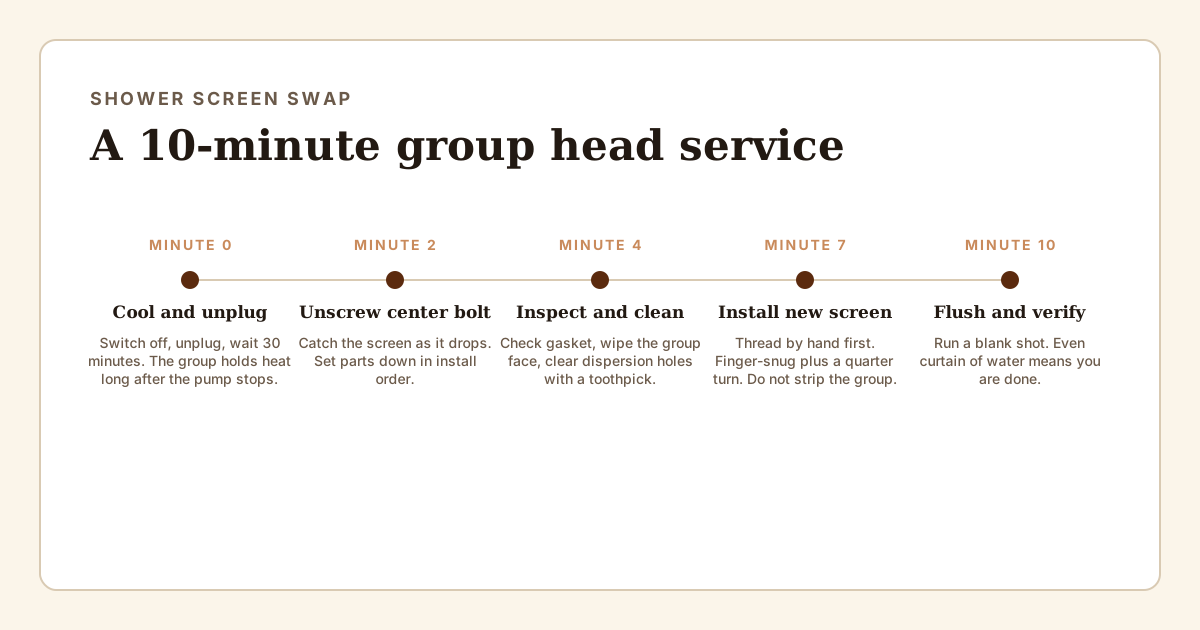
What you'll need
- Replacement shower screen for your group : E61, Breville 54mm, Gaggia 58mm, Rancilio Silvia, and La Marzocco all take different parts. Match by machine model, not by eyeballing diameter.
- A screwdriver that fits the center screw : Usually a flathead or a Phillips #2. E61 groups use a 5mm hex or an M6 bolt depending on vintage.
- A new group gasket (optional but smart) : If the machine is a year or more old and you have the group apart anyway, replace the gasket. It costs $3 to $8 and saves a second teardown.
- Food-safe silicone grease : A pea-sized dab on the new gasket. Any NSF-rated food-safe silicone grease (Molykote 111 is the common one); never petroleum grease.
- A soft cloth and a toothpick : For wiping the group face and clearing gunk out of the dispersion holes before the new screen goes on.
TL;DR
Unplug the machine, let it cool, unscrew the single bolt in the center of the group head, pull the old screen down, wipe the group face clean, and bolt the new screen up snug (not gorilla-tight). Takes 10 minutes. The two things that trip people up: using the wrong screen (match it to your machine model, not just by diameter) and overtightening the center screw into a stripped group thread. Replace the group gasket at the same time if the machine is more than a year old.
When the screen actually needs replacing
A shower screen is a stamped or etched metal disc with dozens to a few hundred small holes. Its job is to spread brew water evenly across the top of the puck. It wears out three ways: clogging with coffee oils and fines, pitting from scale and acidic cleaners, and warping from repeated thermal cycling plus brew pressure.
Replace when any of the following is true:
- The screen is visibly pitted, warped, or dished when you lay it on a flat surface.
- Water from a blank shot (portafilter out, brew button on) comes out in an uneven pattern, with dry patches or heavy spray from one side.
- You’ve started seeing channeling on well-prepped pucks and the usual puck-prep fixes don’t help.
- Backflushing stopped making the screen look clean on the underside. Oils are now baked into the mesh.
The cleaning schedule has you pull the screen every quarter for an overnight soak. Swap in a new one at every second or third of those services, so roughly every 6 to 12 months for a home machine, or straight away if it fails any of the checks above. Busy cafes replace far more often. If you can’t remember replacing yours and you’ve owned the machine over a year, the answer is now.
Match the right part to your machine
This is where most of the mistakes happen. “58mm shower screen” is not a single part. The screen has to match:
- Group type. E61, saturated groups (La Marzocco style), Breville and Sage 54 mm groups, Gaggia Classic, Rancilio Silvia, and De’Longhi all use different screens. Some are flat discs with a center hole; some have a raised lip; some clip in instead of bolting.
- Mounting style. A single center screw (most machines, including Breville and Rancilio Silvia), a two-screw retaining plate (Gaggia Classic), or a snap-in screen on some De’Longhi and Saeco groups. E61 groups use a single center bolt, slotted or hex depending on vintage.
- Diameter and thickness. Close-but-wrong screens will physically fit but seal poorly, which shows up as water weeping around the portafilter during the shot.
The safest path: look up your machine’s parts diagram (the manufacturer’s PDF or a specialist espresso parts retailer) and order by machine model. Don’t order a generic “58mm precision screen” and hope.
If you’re on an E61 machine, precision-etched aftermarket screens (IMS is the common brand) are direct fits with a more uniform hole pattern than the stamped stock screen. On a Breville, the stock replacement is fine; 54 mm aftermarket screens exist, but the gains are smaller.
The replacement, step by step
1. Cool and unplug
Switch the machine off and unplug it. Let it sit 30 minutes if you’ve pulled a shot recently. The group head holds enough heat to burn a fingertip for a while after the pump stops.
2. Remove the portafilter and look up
The screen is the disc you see when you look up into the group head. In the dead center is a single screw. On most machines it’s a flathead or Phillips, 10 to 15mm long. On E61 groups it’s usually a hex or slotted bolt that threads into the dispersion block above the screen.
3. Unscrew, catching the screen
Loosen the bolt. Keep a hand under the screen because once the bolt clears, the screen (and sometimes a small dispersion plate behind it) will drop. Set the parts out in the order they came off, oriented the way they were installed. You will need to put them back the same way.
4. Inspect what came out
Lay the old screen on the counter. Is it dished? Hold a straight edge across it; a bowed screen is distributing water unevenly even when clean. Check the dispersion plate behind it (if your group has one) for the same. Check the group gasket, the rubber ring at the top of the group where the portafilter seats. If it’s rock-hard, cracked, or has a deep imprint ring, replace it now. Group gaskets cost $3 to $8 and the hard part (getting the group apart) is already done.
5. Clean the group face
Wipe the group face, the screw threads, and the recess the screen sits in. A damp cloth plus a toothpick for the dispersion holes. Any grit left on the mating surface will keep the new screen from seating flat and will cause leaks on the first shot.
6. Install the new screen
Place the new screen in the recess, matching the orientation of what came out (most screens are symmetrical, but some have a dimpled or lipped side that goes up). Thread the center bolt by hand first; cross-threading into aluminum or brass is how group heads die. Once it’s hand-snug, give it a final quarter turn with the screwdriver. You want it tight enough that it won’t vibrate loose, not tight enough to compress the screen or strip the thread. If you own a torque screwdriver, 2 to 3 Nm is the right ballpark.
7. Flush and check
Plug the machine back in, let it come to temperature, run a 10-second blank shot without the portafilter. Water should fall in an even curtain across the whole screen face. If you see a jet from one side, dry patches, or water weeping around the edge of the screen, pull it back off and reseat. Lock the portafilter in and pull a real shot to confirm no leaks around the gasket.
Common mistakes
Stripping the center screw thread. The group head is brass or aluminum; the screw is steel. Steel wins. Finger-tight plus a quarter turn is the ceiling. If the screw spins without biting, the thread is stripped and the group needs a thread repair (helicoil or oversize tap), which is a repair-shop job.
Reusing a hardened gasket. You pulled the screen out and the gasket looks fine. It probably isn’t. A gasket that’s been under thermal cycling for a year has compression set and will leak around the portafilter once the screen is sitting at a slightly different depth. Replace it while you’re in there.
Petroleum grease on the gasket. Vaseline, white lithium, and most mechanical greases swell food-grade rubber and taint the shot. Use Molykote 111 or a food-safe silicone equivalent. A pea-sized amount, smeared thin.
Buying the wrong screen because it was cheap. A 58mm screen that’s half a millimeter undersized will seal poorly and the first shot will spit out the sides of the portafilter. Match the part number to your machine, not the diameter to your tape measure.
Running a chemical backflush as the first test. A detergent cycle hides the two things you want to see: whether water falls evenly off the new screen and whether the gasket seals at normal brew pressure. Run a blank flush and a real shot first, then go back to the usual cadence in how to backflush an espresso machine.
Troubleshooting
Water weeps around the portafilter after I replaced the screen. The group gasket is either worn out, misseated, or being held off by debris. Pull the portafilter, pull the screen back off, wipe everything, inspect the gasket. If it’s hard or has a deep imprint, replace it. If it’s soft and clean, make sure nothing is caught between it and the group when you reinstall.
The center screw won’t tighten; it just spins. The thread in the group head is stripped. Stop. Overtightening further will chew it worse. The fix is a thread repair insert (brass or stainless), which most home users send out to a repair shop.
The new screen looks clogged after only two weeks. Either the beans are oily (dark roast, see roast levels), the backflush routine has lapsed, or the dispersion plate behind the screen is holding onto old grounds. Pull the screen, check the plate, run a chemical backflush with Cafiza, and tighten up the daily rinse.
Shots started channeling right after the swap. Unlikely but possible: the new screen’s hole pattern is different enough that your old puck prep is now revealing distribution problems. If it persists, revisit tamping and WDT. If channeling only appeared after a screen swap on a Breville or similar, double-check the screen is seated flat and the bayonet is fully engaged.
I can see the screen but there’s no center screw on my machine. Some groups hold the screen with a retaining plate on two perimeter screws (Gaggia Classic), and some De’Longhi and Saeco screens snap in and pry out with a flat blade. Check the manufacturer’s parts diagram before prying anything.
Frequently asked
How often should I replace the shower screen?
Every 6 to 12 months for a home machine pulling two to six shots a day, assuming you backflush weekly. If you can see pitting, warping, or dark staining that won't scrub off, replace sooner. A screen that looks clean on top can still be clogged underneath, so pull it at every quarterly soak and check it then.
Can I just clean the old screen instead of replacing it?
For a while, yes. Soak it in a Cafiza solution for 20 minutes, scrub with a soft brush, rinse. That resets a mildly clogged screen. But the mesh deforms over time from heat cycling and brew pressure, and once it's warped the water distribution is uneven no matter how clean it looks. A warped screen causes channeling you can't fix with better puck prep. Replace it when cleaning stops restoring even flow.
What's the difference between a shower screen, a dispersion screen, and an IMS screen?
The shower screen is the perforated disc that bolts to the bottom of the group head and contacts the puck. The dispersion screen (or dispersion block) sits above it inside the group and spreads water from the single inlet across the whole screen. IMS is a brand that makes precision-etched replacement screens with more uniform hole patterns than stock stamped ones. On most machines you only replace the shower screen as a user-serviceable part; the dispersion block comes out only during a full group service.
Do IMS or aftermarket precision screens actually improve shots?
On entry and mid-range machines with stamped stock screens, usually yes. The holes are more uniform, the open area is larger, and water distributes more evenly across the puck. Expect slightly less channeling, not a transformed shot. On E61 groups and higher-end machines the stock screen is already decent, so the gain is marginal. At $15 to $25 it is one of the cheaper upgrades to try.
My new screen is leaking around the edge. What did I do wrong?
Either the group gasket is old and no longer sealing, the screen isn't seated flat (debris between it and the group face), or the center screw isn't tight enough. Pull it back off, wipe the group face completely clean, check the gasket for cracks or compression set, and reinstall. If the gasket has a visible ring imprint from the portafilter and feels hard, replace it. A soft, pliable gasket seals; a hardened one does not.
Do I need to depressurize or unplug the machine first?
Unplug it, yes. Depressurize by running a short blank shot or opening the steam valve until the hissing stops (and the gauge reads zero, if your machine has one). The group itself isn't pressurized at rest on most home machines, but the boiler is, and you want the machine cold enough to touch the group comfortably. Give it 30 minutes off before you start.